Developer Guide
- Table of Contents
- Acknowledgements
- Setting up, getting started
- Design
- Implementation
- Documentation, logging, testing, configuration, dev-ops
- Appendix: Requirements
- Appendix: Instructions for manual testing
-
Appendix: Planned Enhancements
- Ability to export specific groups to CSV files
- Ability to change export filename or file path
- Ability to import groups
- Better student duplication handling
- Support for special characters in name and class fields
- Increasing support to host more student information
- Increased filter options for students
- Support for precise student name searching
Acknowledgements
GoonBook is a brownfield software project based off AddressBook Level-3 (UG, DG), taken under the CS2103T Software Engineering module held by the School of Computing at the National University of Singapore.
Java dependencies:
- JavaFX for GUI
- JUnit5 for testing
Documentation dependencies:
- Jekyll for rendering the website
- PlantUML for creating UML diagrams
Setting up, getting started
Refer to the guide Setting up and getting started.
Design
 Tip: The
 .puml files used to create diagrams in this document docs/diagrams folder. Refer to the
PlantUML Tutorial at se-edu/guides to learn how to create
and edit diagrams.
Architecture
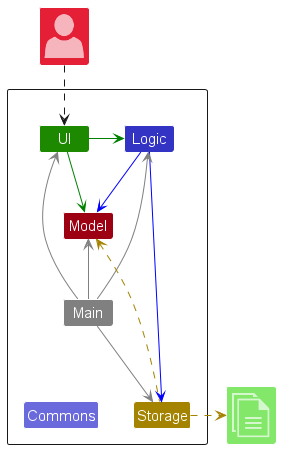
The Architecture Diagram given above explains the high-level design of the App.
Given below is a quick overview of main components and how they interact with each other.
Main components of the architecture
Main (consisting of
classes Main
and MainApp) is
in charge of the app launch and shut down.
- At app launch, it initializes the other components in the correct sequence, and connects them up with each other.
- At shut down, it shuts down the other components and invokes cleanup methods where necessary.
The bulk of the app’s work is done by the following four components:
-
UI: The UI of the App. -
Logic: The command executor. -
Model: Holds the data of the App in memory. -
Storage: Reads data from, and writes data to, the hard disk.
Commons represents a collection of classes used by multiple other components.
How the architecture components interact with each other
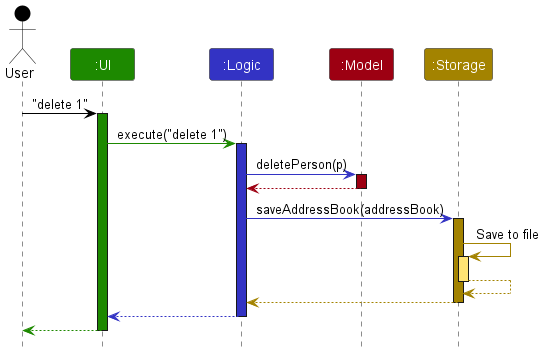
The Sequence Diagram below shows how the components interact with each other for the scenario where the user issues
the command delete 1.
Each of the four main components (also shown in the diagram above),
- defines its API in an
interfacewith the same name as the Component. - implements its functionality using a concrete
{Component Name}Managerclass (which follows the corresponding APIinterfacementioned in the previous point.
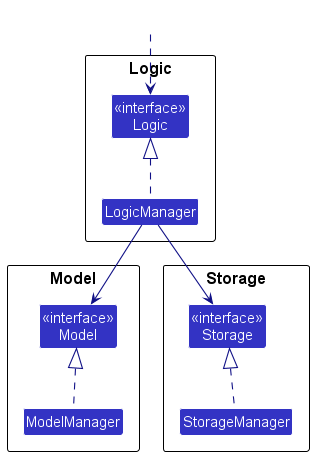
For example, the Logic component defines its API in the Logic.java interface and implements its functionality using
the LogicManager.java class which follows the Logic interface. Other components interact with a given component
through its interface rather than the concrete class (reason: to prevent outside component’s being coupled to the
implementation of a component), as illustrated in the (partial) class diagram below.
The sections below give more details of each component.
UI component
The API of this component is specified
in Ui.java
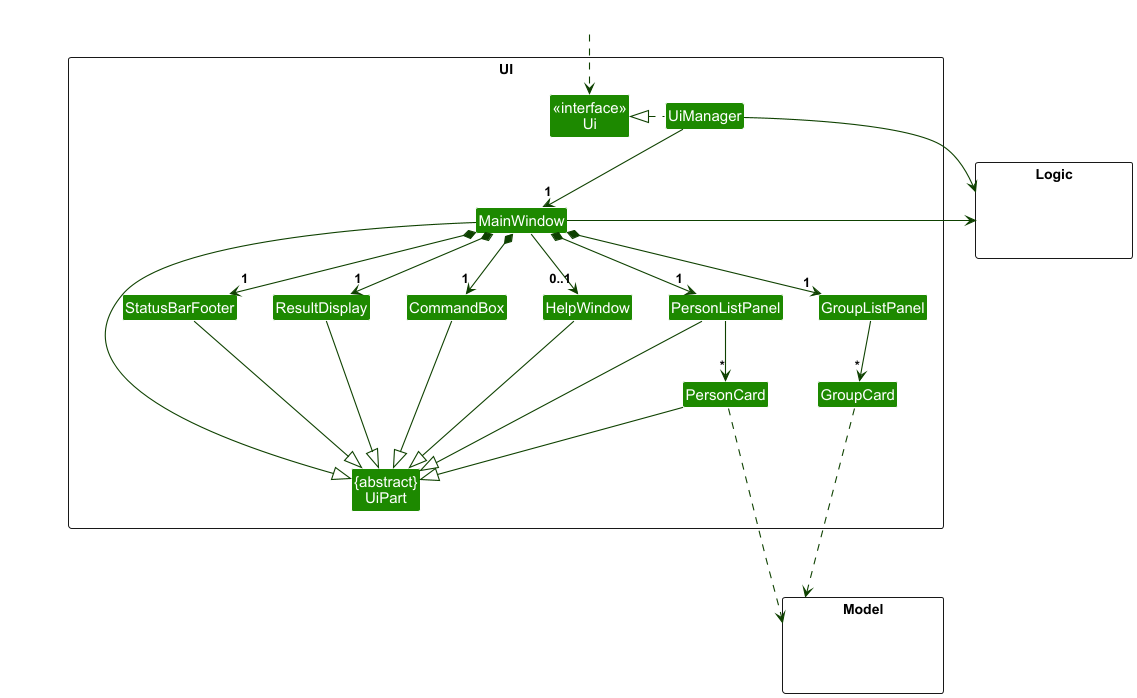
The UI consists of a MainWindow that is made up of parts
e.g.CommandBox, ResultDisplay, PersonListPanel, StatusBarFooter etc. All these, including the MainWindow,
inherit from the abstract UiPart class which captures the commonalities between classes that represent parts of the
visible GUI.
The UI component uses the JavaFx UI framework. The layout of these UI parts are defined in matching .fxml files that
are in the src/main/resources/view folder. For example, the layout of
the MainWindow
is specified
in MainWindow.fxml
The UI component,
- executes user commands using the
Logiccomponent. - listens for changes to
Modeldata so that the UI can be updated with the modified data. - keeps a reference to the
Logiccomponent, because theUIrelies on theLogicto execute commands. - depends on some classes in the
Modelcomponent, as it displaysPersonobject andGroupobject residing in theModel.
Logic component
API : Logic.java
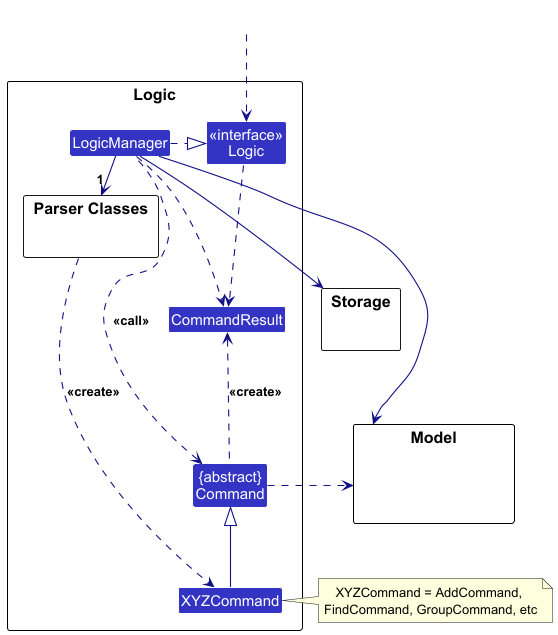
Here’s a (partial) class diagram of the Logic component:
The sequence diagram below illustrates the interactions within the Logic component, taking execute("delete 1") API
call as an example.
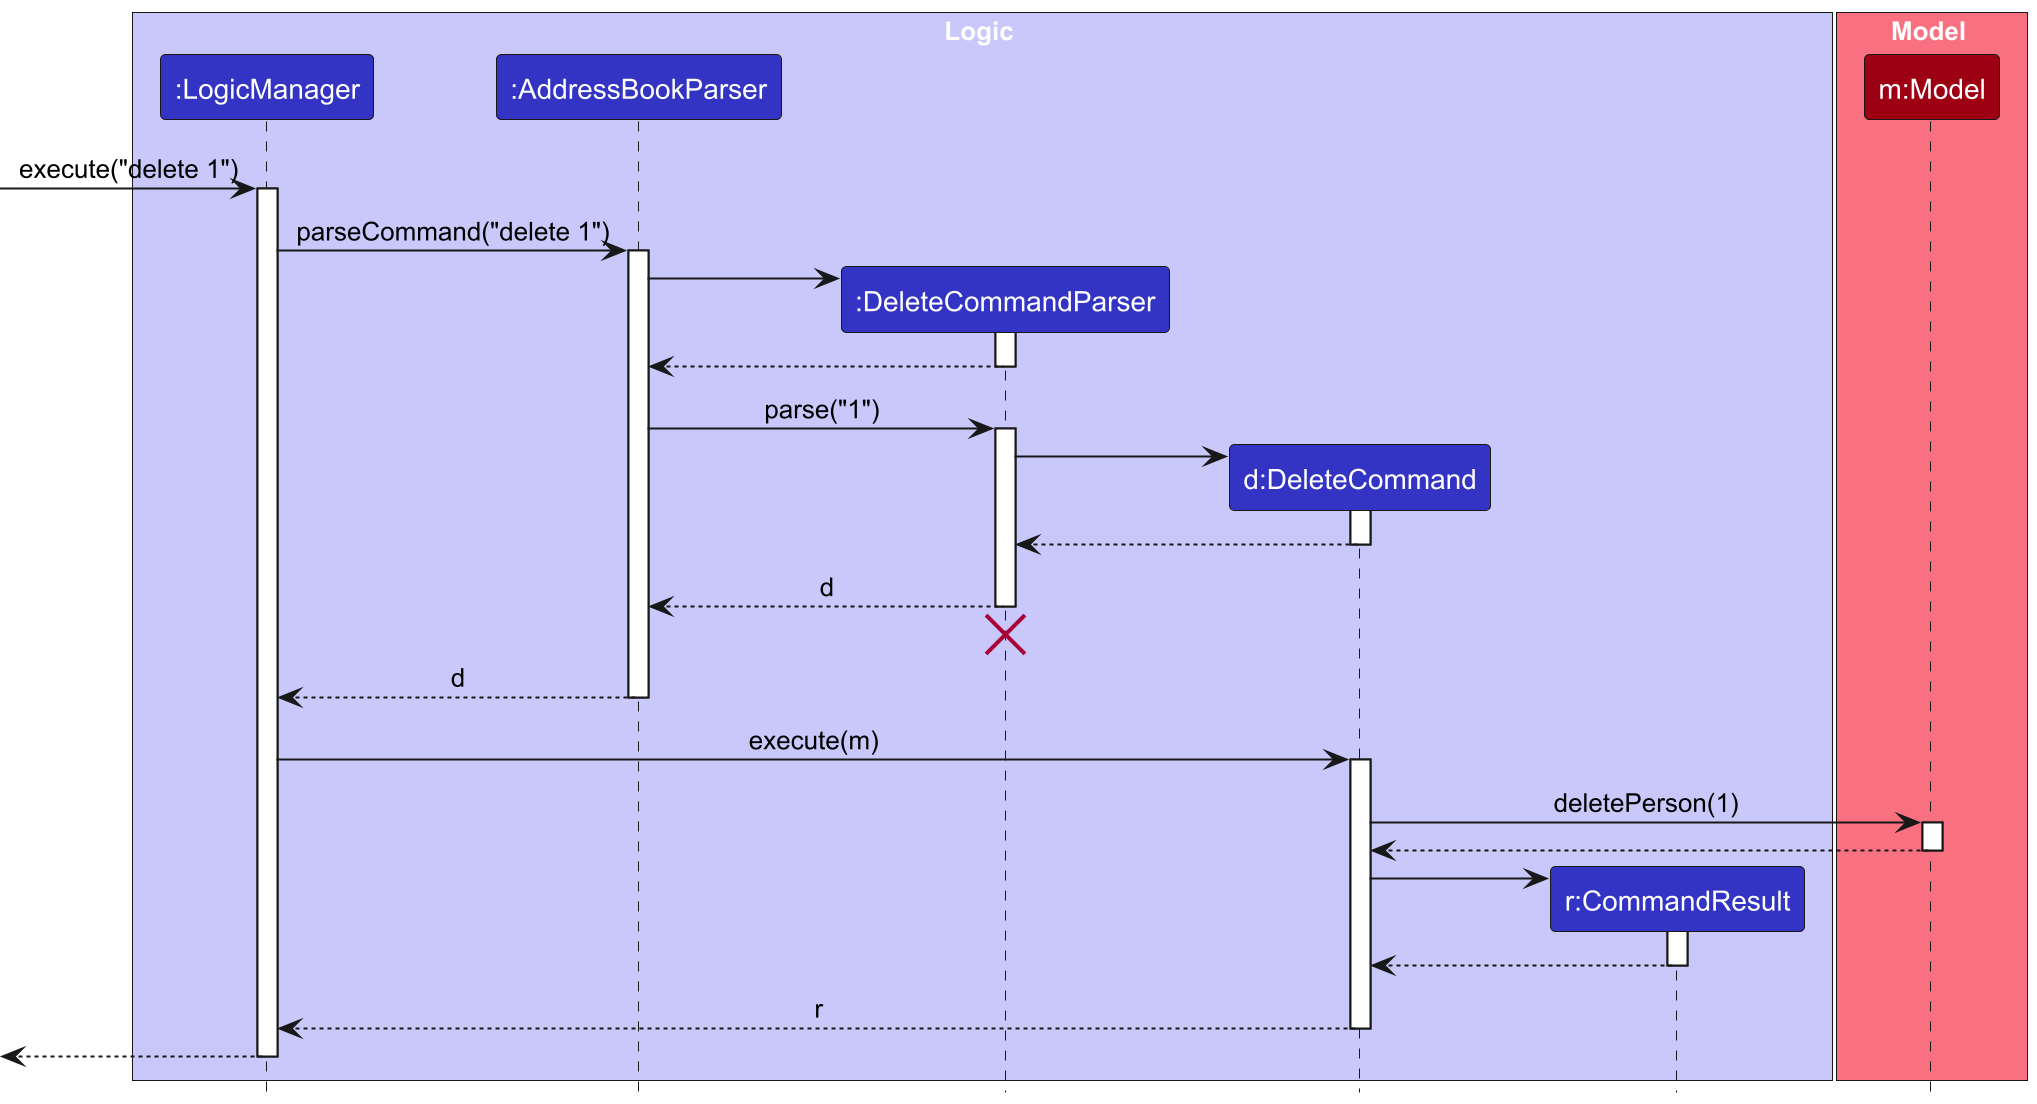
 Note: The lifeline for
 DeleteCommandParser should end at the destroy marker (X) but due to a limitation of PlantUML, the lifeline continues till the end of diagram.
How the Logic component works:
- When
Logicis called upon to execute a command, it is passed to anAddressBookParserobject which in turn creates a parser that matches the command (e.g.,DeleteCommandParser) and uses it to parse the command. - This results in a
Commandobject (more precisely, an object of one of its subclasses e.g.,DeleteCommand) which is executed by theLogicManager. - The command can communicate with the
Modelwhen it is executed (e.g. to delete a person).
Note that although this is shown as a single step in the diagram above (for simplicity), in the code it can take several interactions (between the command object and theModel) to achieve. - The result of the command execution is encapsulated as a
CommandResultobject which is returned back fromLogic.
Here are the other classes in Logic (omitted from the class diagram above) that are used for parsing a user command:
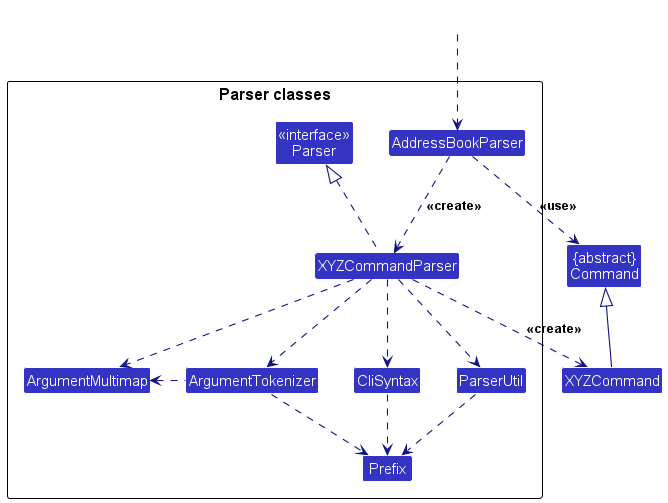
How the parsing works:
- When called upon to parse a user command, the
AddressBookParserclass creates anXYZCommandParser(XYZis a placeholder for the specific command name e.g.,AddCommandParser) which uses the other classes shown above to parse the user command and create aXYZCommandobject (e.g.,AddCommand) which theAddressBookParserreturns back as aCommandobject. - All
XYZCommandParserclasses (e.g.,AddCommandParser,DeleteCommandParser, …) inherit from theParserinterface so that they can be treated similarly where possible e.g, during testing.
Model component
API : Model.java
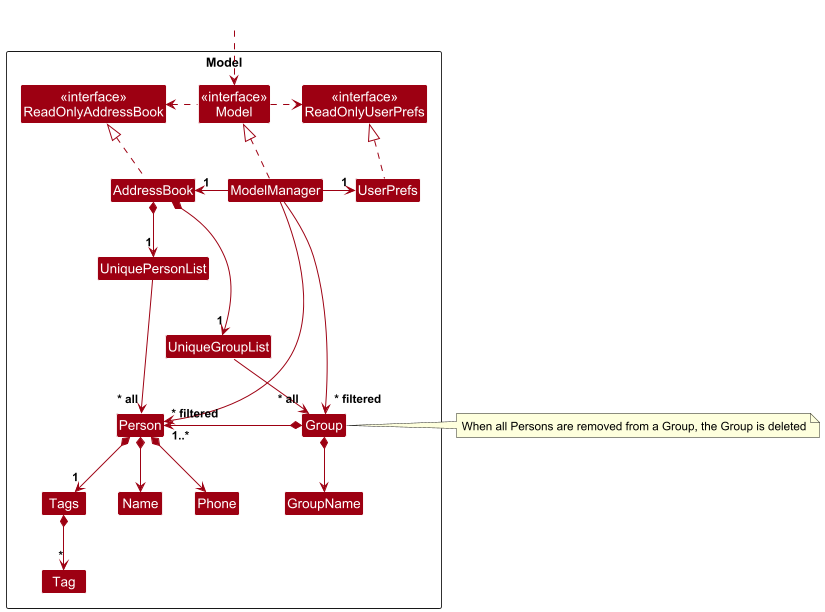
The Model component,
- stores the address book data i.e., all
Personobjects (which are contained in aUniquePersonListobject). - stores the currently ‘selected’
Personobjects (e.g., results of a search query) as a separate filtered list which is exposed to outsiders as an unmodifiableObservableList<Person>that can be ‘observed’ e.g. the UI can be bound to this list so that the UI automatically updates when the data in the list change. -
stores the currently ‘selected’
Groupobjects (e.g., results of a search query) as a separate filtered list which is exposed to outsiders as an unmodifiableObservableList<Group>that can be ‘observed’ e.g. the UI can be bound to this list so that the UI automatically updates when the data in the list change. - stores a
UserPrefobject that represents the user’s preferences. This is exposed to the outside as aReadOnlyUserPrefobjects. - does not depend on any of the other three components (as the
Modelrepresents data entities of the domain, they should make sense on their own without depending on other components)
Note: An alternative (arguably, a more OOP) model is given below. It has a Tag list in the AddressBook, which Person references. This allows AddressBook to only require one Tag object per unique tag, instead of each Person needing their own Tag objects.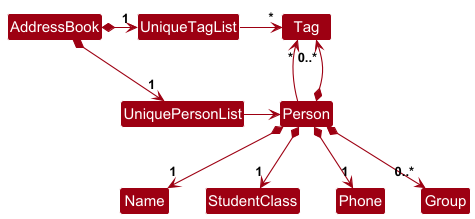
Storage component
API : Storage.java
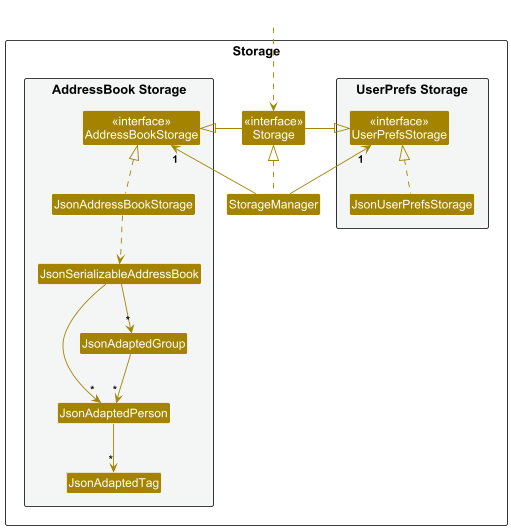
The Storage component,
- can save both address book data and user preference data in JSON format, and read them back into corresponding objects.
- inherits from both
AddressBookStorageandUserPrefStorage, which means it can be treated as either one (if only the functionality of only one is needed). - depends on some classes in the
Modelcomponent (because theStoragecomponent’s job is to save/retrieve objects that belong to theModel)
Common classes
Classes used by multiple components are in the seedu.address.commons package.
Implementation
This section describes some noteworthy details on how certain features are implemented.
Group feature
The GroupCommand allows educators to group students together within the application. This is particularly useful for managing classes, group-based activities, assignments, and projects efficiently.
Implementation Details
The GroupCommand is implemented by extending the base Command class. It uses prefixes such as /g, /s, specifying
required data fields groupName, students, respectively. Once the data fields are filled,
a new Group is added. It implements the following operations:
-
execute(Model)— Checks the current address book state by calling the following methods as part of our defensive programming:-
model.hasGroupName(new Group(groupName, List.of())), and throws aCommandExceptionif a duplicate Group is found -
groupName.isEmpty(), and throws aCommandExceptionif a the group name field is empty is found -
model.getFilteredPersonList(), to obtain aList<Person>to iterate over to search for the inputted student names and adding them to a newList<Person>to be passed into the constrcutor for a newGroup
-
-
addGroup(group)— Adds the Group to the group list. This operation is exposed in theModelinterface asModel#addGroup(Group).
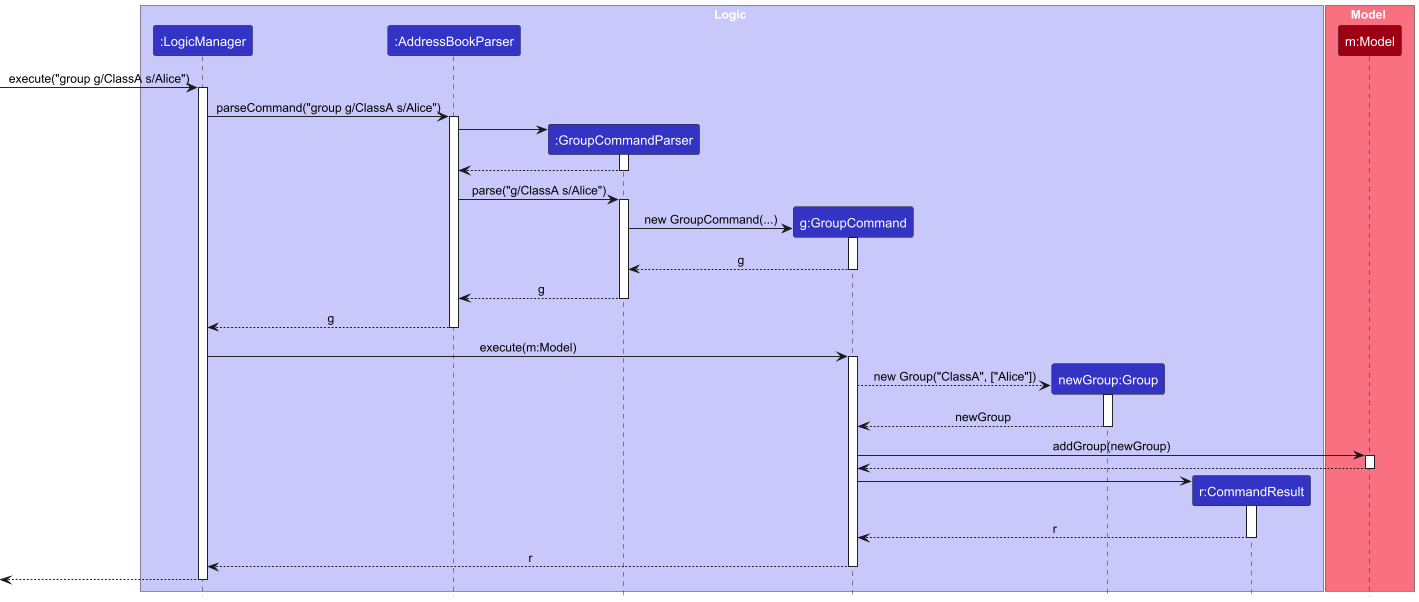
The Group command is initiated by firstly checking the filtered group list to ensure no duplicate is found, after which Model#addGroup(Group) is called to complete the actual addition.
Given below is an example usage scenario of how the addition mechanism behaves when the user tries to add a group to the group list.
Step 1. The user launches the application, with some students and groups added to the address book already.
The AddressBook will be initialized with the previously saved address book state.
Step 2. The user executes group command with the specific data at each prefix to specify the person to be added.
The GroupCommand will then call excecute(), which checks whether there is a duplicate Group in the group list before calling addGroup(Group).
Note: If the groupName and students provided is invalid, a CommandException will be thrown.
Sequence Diagram
Design considerations:
Aspect: How Group executes:
-
Alternative 1 (current choice): Create a new
GroupObject containing a list ofPerson, and storing it in themodelcomponent.- Pros: Easier to implement and more intuitive.
- Cons: May have performance issues in terms of memory usage, and deleting a student will require iterating over all
Groups to ensure it is deleted from all groups
-
Alternative 2: Each
PersonObject has a field of a List of all the groups it is in.- Pros: Deleting a person is alot easier (Simply by deleting the
PersonObject will remove it from all theGroups it is in)). - Cons: Very hard to implement, and not a good representation of the has-a relationship between
GroupandPerson.
- Pros: Deleting a person is alot easier (Simply by deleting the
Delete Group feature
The DeleteGroupCommand allows educators to delete Groups within the application. This is particularly useful
for deleting Groups that the user no longer need, assisting the management of Groups.
Implementation Details
The DeleteGroupCommand is implemented by extending the base Command class. It does not use any prefixes, rather
using the groupName to identify which group to delete. Once the data fields are filled, it will look for the specified group containing that groupName and delete it.
It implements the following operations:
-
execute(Model)— Checks the current address book state by calling themodel.getFilteredGroupList()to obtain anObservableList<Group>and iterating over it to find a matchinggroupName, throwing aCommandExceptionif noGroupis found. -
deleteGroup(groupToDelete)— Deletes the Group from the group list. This operation is exposed in theModelinterface asModel#deleteGroup(Group).
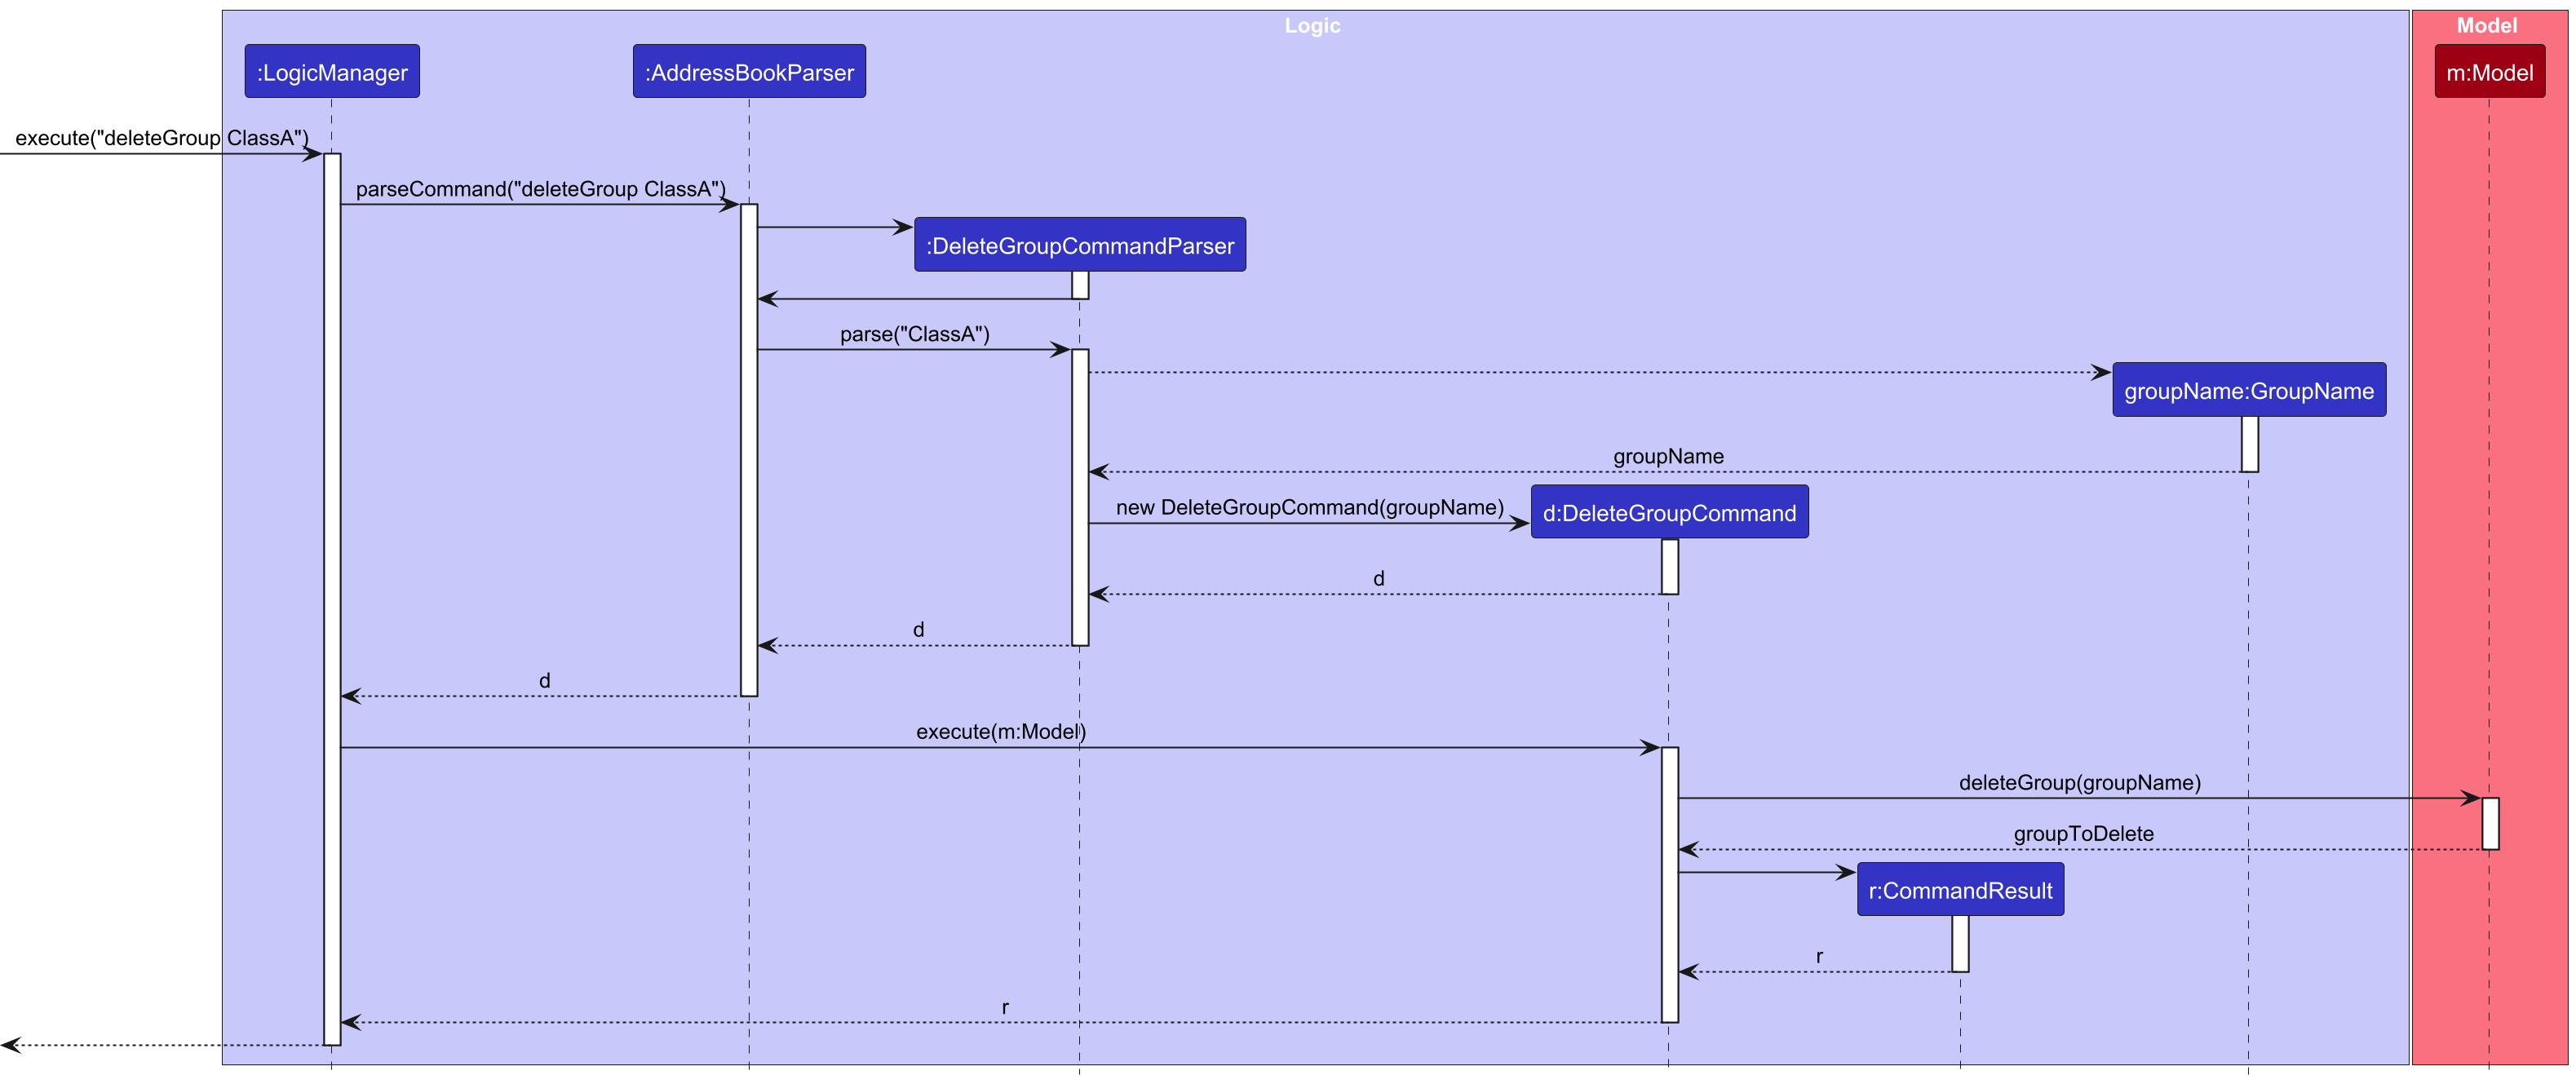
Given below is an example usage scenario of how the delete group mechanism behaves when the user tries to delete a group from the group list.
Step 1. The user launches the application, with some students and groups added to the address book already. The
AddressBook will be initialized with the previously saved address book state.
Step 2. The user executes deleteGroup command with the specified Group Name to specify the Group to be added.
The deleteGroupCommand will then call excecute(), which checks whether there is a Group in the group list that
matches the name before calling deleteGroup(Group).
Sequence Diagram
Design considerations:
Aspect: How deleteGroup executes:
-
Alternative 1 (current choice): Iterating over all
Groupin model and searching for a match and proceeding to delete that group- Pros: Easier to implement, and deleting a Group will not cause bugs in other logic components
- Cons: Can become very slow when there are many groups in
Logic
-
Alternative 2: Using a Hash to map every groupName to its respective Group
- Pros: Deleting a Group is much faster, since there is no longer a need to iterate over all groups within model
- Cons: The logic will be much more complicated, and showing a Hash through JavaFx is much more difficult compared to using the already provided
ObservableList
Export feature
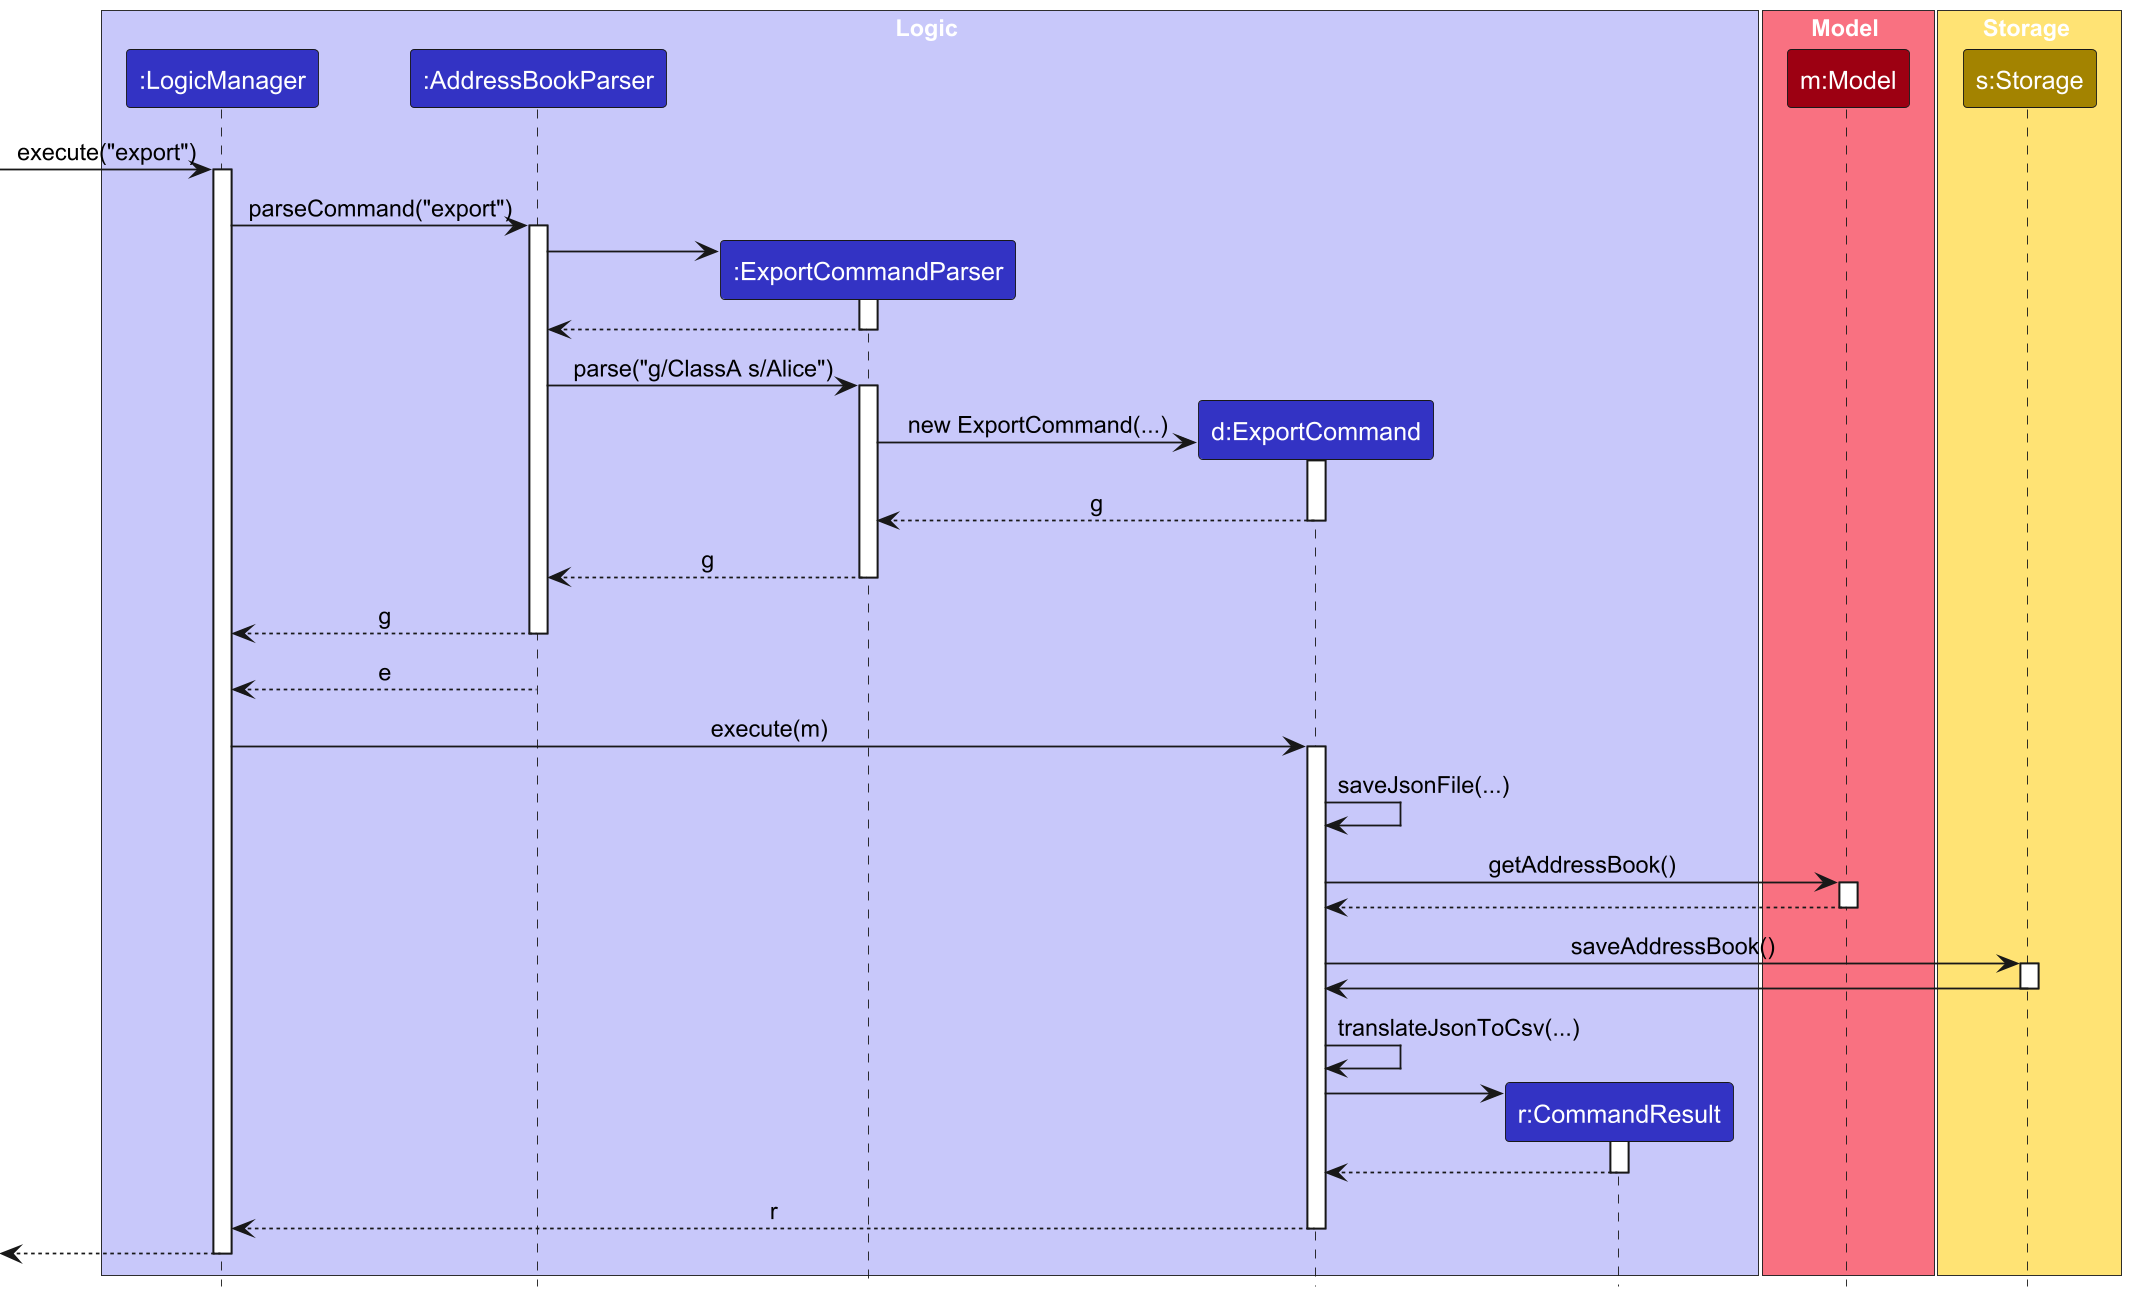
The ExportCommand allows educators to export the data in their current GoonBook storage out as a csv file for usage in other spreadsheets such as Google spreadsheets, giving GoonBook seamless integration with existing spreadsheet editors.
Implementation Details
The ExportCommand is implemented by extending the base Command class. It does not use any prefixes, and is called as is. Once the data fields, like projectRootPath are filled, it will proceed to convert the data in model into a json file, then into a csv file for the user to freely use. It implements the following operations:
-
execute(Model)— Obtain thePathObjects that represent both the import directory, and the export directory, by calling thePath#resolvemethod. -
saveJsonfile— Takes in themodel,importPathandexportPathas parameters to then convert the data in model to a csv file by further calling the methodstranslateJsonToCsvandgetPersonTagswhich will perform the necessary actions to convert the json file into a csv file
Given below is an example usage scenario of how the export mechanism behaves when the user tries to export data from GoonBook.
Step 1. The user launches the application, with some students and groups added to the address book already. The
AddressBook will be initialized with the previously saved address book state.
Step 2. The user executes export command. The ExportCommand will then call excecute(), which proceeds to take the current data stored in the address book and converting it into a csv file, and saving it in the same directory as root for the user to access
Sequence Diagram
Design considerations:
Aspect: How export executes:
-
Alternative 1 (current choice): Using the existing Storage interface and addressBook.json to directly convert into a csv file
- Pros: Has already laid the foundation for our csv conversion method to build off from
- Cons: Has an added dependency on the json file, so if any issues were to occur to the json coverter, it would mean that the export function would no longer function
-
Alternative 2: Directly exporting the data of the address book and converting it into a csv file without needing the dependency on the json file
- Pros: Will ensure that any bugs with the jsonAdaptablePersons and etc will not affect the functionality of the export function, since they would no longer be associated
- Cons: Extremely hard to implement, and would not be worth the hassle
Tag feature
The TagCommand allows educators to add custom tags to their students for quality of life benefits, such as reminders, or to categorise them accordingly.
Implementation Details
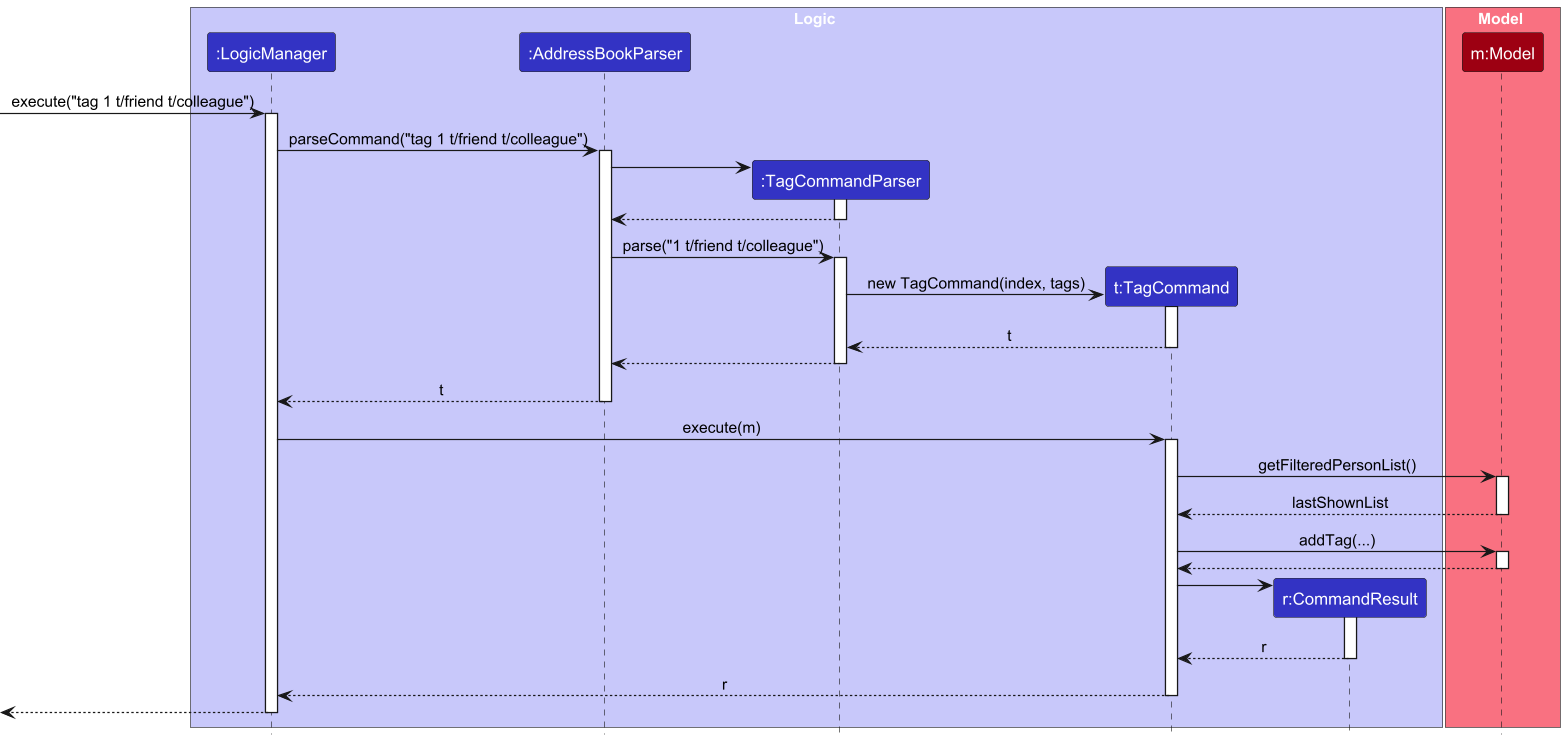
The TagCommand is implemented by extending the base Command class. It uses only the prefix /t taking in a index as the other part of the command syntax, specifying required data fields newTags and targetIndex, respectively. Once the data fields are filled, new tags are added to a specified Person. It implements the following operations:
-
execute(Model)— Obtain aList<Person>using themodel.getFilteredPersonList, and using thetargetIndexto get the correspondingPersonobject to add thenewTagsto, by callingmodel.addTag -
targetIndex.getZeroBased— Used to check if the given index is larger than the size of the filteredPersonList, and throws aCommandExceptionif the index is larger than the index in filteredPersonList -
model.tagExists(person, newTags)— Used to check if the person object already has the given tag name already, throws aCommandExceptionif the person is found to already have an existing tag of the same name
Given below is an example usage scenario of how the tag mechanism behaves when the user tries to add a tag to a student
Step 1. The user launches the application, with some students and groups added to the address book already.
The AddressBook will be initialized with the previously saved address book state.
Step 2. The user executes tag command. The TagCommand will then call excecute(), which proceeds to take
the list of filtered person, and using the index provided by the user, choose that specific person to add the given
tags to
Sequence Diagram
Design considerations:
Aspect: How tag executes:
-
Alternative 1 (current choice): Using a Set to implement a collection of tags per student
- Pros: Can easily check to see if there are any duplicate tags due to the nature of the data structure, saving time that would have otherwise been spent iterating through it
- Cons: If we ever decided to allow multiple tags with the same name, we will not be able to do so
- Alternative 2: Using a List to implement a collection of Tags
-
- Pros: Much simpler to implement, and familiar to use
- Cons: Can become very inefficient, when there are many tags, it could take some time to iterate through every tag one by one to ensure that the same tag doesn’t exist twice
[Proposed] Undo/redo feature
Proposed Implementation
The proposed undo/redo mechanism is facilitated by VersionedAddressBook. It extends AddressBook with an undo/redo
history, stored internally as an addressBookStateList and currentStatePointer. Additionally, it implements the
following operations:
-
VersionedAddressBook#commit()— Saves the current address book state in its history. -
VersionedAddressBook#undo()— Restores the previous address book state from its history. -
VersionedAddressBook#redo()— Restores a previously undone address book state from its history.
These operations are exposed in the Model interface as Model#commitAddressBook(), Model#undoAddressBook()
and Model#redoAddressBook() respectively.
Given below is an example usage scenario and how the undo/redo mechanism behaves at each step.
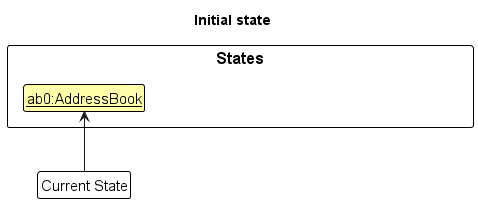
Step 1. The user launches the application for the first time. The VersionedAddressBook will be initialized with the
initial address book state, and the currentStatePointer pointing to that single address book state.
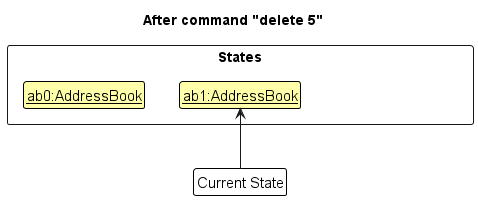
Step 2. The user executes delete 5 command to delete the 5th person in the address book. The delete command
calls Model#commitAddressBook(), causing the modified state of the address book after the delete 5 command executes
to be saved in the addressBookStateList, and the currentStatePointer is shifted to the newly inserted address book
state.
Step 3. The user executes add n/David … to add a new person. The add command also
calls Model#commitAddressBook(), causing another modified address book state to be saved into
the addressBookStateList.
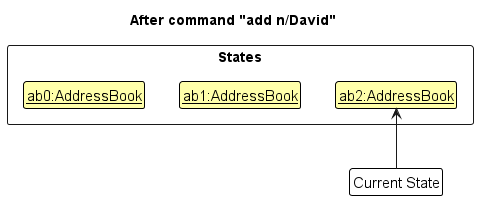
Note: If a command fails its execution, it will not call Model#commitAddressBook(), so the address book state will not be saved into the addressBookStateList.
Step 4. The user now decides that adding the person was a mistake, and decides to undo that action by executing
the undo command. The undo command will call Model#undoAddressBook(), which will shift the currentStatePointer
once to the left, pointing it to the previous address book state, and restores the address book to that state.
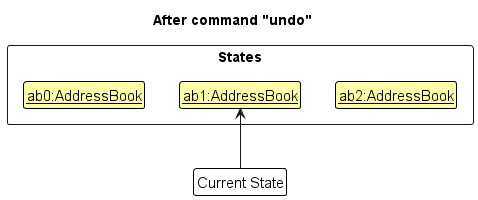
Note: If the currentStatePointer is at index 0, pointing to the initial AddressBook state, then there are no previous AddressBook states to restore. The undo command uses Model#canUndoAddressBook() to check if this is the case. If so, it will return an error to the user rather
than attempting to perform the undo.
The following sequence diagram shows how an undo operation goes through the Logic component:
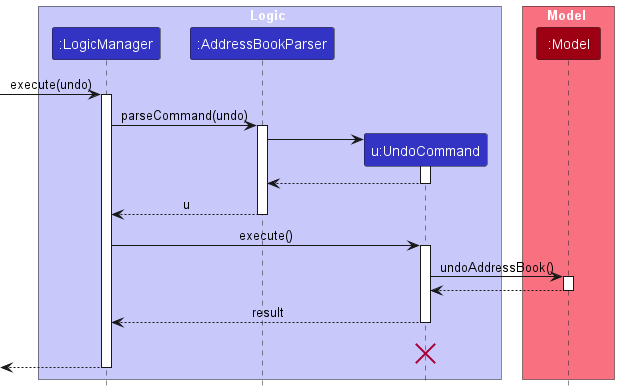
Note: The lifeline for UndoCommand should end at the destroy marker (X) but due to a limitation of PlantUML, the lifeline reaches the end of diagram.
Similarly, how an undo operation goes through the Model component is shown below:
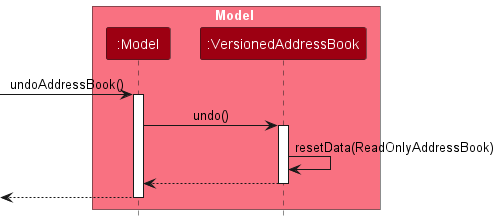
The redo command does the opposite — it calls Model#redoAddressBook(), which shifts the currentStatePointer once
to the right, pointing to the previously undone state, and restores the address book to that state.
Note: If the currentStatePointer is at index addressBookStateList.size() - 1, pointing to the latest address book state, then there are no undone AddressBook states to restore. The redo command uses Model#canRedoAddressBook() to check if this is the case. If so, it will return an error to the user rather than attempting to perform the redo.
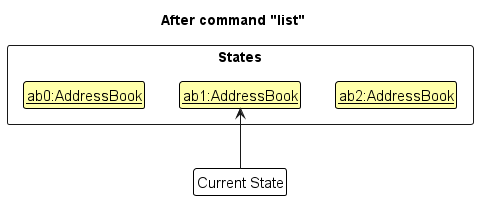
Step 5. The user then decides to execute the command list. Commands that do not modify the address book, such
as list, will usually not call Model#commitAddressBook(), Model#undoAddressBook() or Model#redoAddressBook().
Thus, the addressBookStateList remains unchanged.
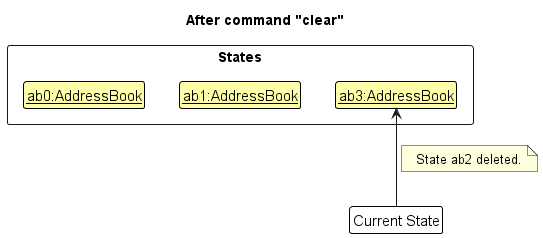
Step 6. The user executes clear, which calls Model#commitAddressBook(). Since the currentStatePointer is not
pointing at the end of the addressBookStateList, all address book states after the currentStatePointer will be
purged. Reason: It no longer makes sense to redo the add n/David … command. This is the behavior that most modern
desktop applications follow.
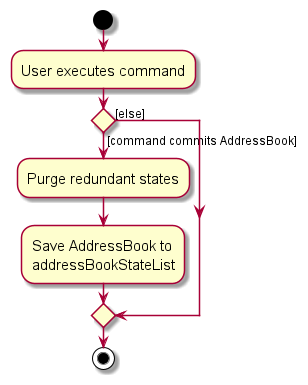
The following activity diagram summarizes what happens when a user executes a new command:
Design considerations:
Aspect: How undo & redo executes:
-
Alternative 1 (current choice): Saves the entire address book.
- Pros: Easy to implement.
- Cons: May have performance issues in terms of memory usage.
-
Alternative 2: Individual command knows how to undo/redo by itself.
- Pros: Will use less memory (e.g. for
delete, just save the person being deleted). - Cons: We must ensure that the implementation of each individual command are correct.
- Pros: Will use less memory (e.g. for
Documentation, logging, testing, configuration, dev-ops
Appendix: Requirements
Product scope
Target user profile:
- educators who need to micromanage multiple students
- prefer desktop apps over other types
- can type fast
- prefers typing to mouse interactions
- is reasonably comfortable using CLI apps
Value proposition: Goon Book is specialised to help educators with keeping track of their students. It can be used to record their students with their details, and access relevant information easily and conveniently
User Stories
| Priority | As a … | I want to … | So that I can… | |
|---|---|---|---|---|
* * * |
educator | add a new student | include all students I have currently in my app | |
* * * |
educator | delete a student | keep my database of students concise with only currently relevant students | |
* * * |
educator | search for students by name | find information about specific students | |
* * * |
educator | group students | efficiently manage classes, group-based activities, assignments, and projects | |
* * * |
educator | delete groups | correct mistakes by deleting a group | |
* * * |
educator | import and export student data from other systems | streamline data management and avoid manual entry, ensuring compatibility with school databases or grade books | |
* * |
educator | search for groups by name | find information about specific groups of students | |
* * |
educator | store additional information about students on grades, attendance or notes | better access and organise student information | |
* * |
educator | edit a student’s details | correct mistakes or update new information about the student | |
* * |
educator | filter searched students by name | quickly find specific students | |
* |
educator | use security measures for student data | protect sensitive information and control access to parental data |
Use cases
(For all use cases below, the System is the GoonBook and the Actor is the Educator, unless specified
otherwise)
Use Case: UC01 - Add a New Student
Main Success Scenario (MSS):
- Educator chooses to add a new student.
- System prompts for the student’s name, class, and contact information.
- Educator enters the student’s name, class, and contact information.
- System validates the input.
- System adds the new student to the student list.
-
System displays a confirmation message.
Use case ends.
Extensions:
-
2a. Educator submits the form without entering the class or contact information.
- 2a1. System detects the missing class or contact information and returns an invalid command format message.
-
2a2. Educator provides the missing information.
Use case resumes from step 3.
-
3a. System detects that the entered student is a duplicate.
-
3a1. System informs the educator that the student already exists and cancels the addition.
Use case ends.
-
-
3b. System detects invalid characters in the student’s name (e.g., non-alphabetic characters).
- 3b1. System requests the educator to enter a valid name.
-
3b2. Educator enters a valid name.
Steps 3b1-3b2 are repeated until the input is valid.
Use case resumes from step 4.
-
3c. System detects invalid input in the contact information (e.g., non-numeric characters).
- 3c1. System requests the educator to enter a valid contact number.
-
3c2. Educator enters a valid contact number.
Steps 3c1-3c2 are repeated until the input is valid.
Use case resumes from step 4.
Use Case: UC02 - Search for a Student
Main Success Scenario (MSS):
- Educator chooses to search for a student.
- System prompts for the student’s name or keywords.
- Educator enters the student’s name or search keywords.
- System searches for matching students.
-
System displays the list of matching students with their contact and class information.
Use case ends.
Extensions:
-
4a. No students match the search criteria.
-
4a1. System informs the educator that no matching students were found.
Use case ends.
-
Use Case: UC03 - Delete a Student
Main Success Scenario (MSS):
- Educator chooses to delete a student.
- System prompts for the student’s index in the list.
- Educator enters the student’s index.
- System deletes the student from the student list.
-
System displays a confirmation message.
Use case ends.
Extensions:
-
3a. The specified index is invalid.
- 3a1. System informs the educator of the invalid index.
-
3a2. Educator enters a valid index.
Use case resumes from step 4.
Use Case: UC04 - Edit a Student
Main Success Scenario (MSS):
- Educator chooses to edit a student.
- Educator enters the student’s index and new details to update.
- System validates the new input.
- System updates the student’s information.
-
System displays a confirmation message.
Use case ends.
Extensions:
-
3a. The specified index is invalid.
- 3a1. System informs the educator of the invalid index.
-
3a2. Educator enters a valid index.
Use case resumes from step 4.
-
3b. System detects invalid input in the new details.
- 3b1. System requests the educator to correct the invalid input.
-
3b2. Educator enters valid details.
Use case resumes from step 4.
Use Case: UC05 - List All Students
Main Success Scenario (MSS):
- Educator chooses to list all students.
- System retrieves the list of all students.
-
System displays the list with students’ names, classes, and contact information.
Use case ends.
Use Case: UC06 - List All Groups
Main Success Scenario (MSS):
- Educator chooses to list all groups.
- System retrieves the list of all groups.
-
System displays the list with group names and member information.
Use case ends.
Use Case: UC07 - Group Students Together
Main Success Scenario (MSS):
- Educator chooses to create a new group.
- System prompts for the group name.
- Educator enters the group name.
- System prompts to select students to add to the group.
- Educator selects students from the student list.
- System validates the group name and selected students.
- System creates the new group with the selected students.
-
System displays a confirmation message.
Use case ends.
Extensions:
-
3a. Educator enters a group name that already exists.
- 3a1. System informs the educator of the duplicate group name.
-
3a2. Educator enters a unique group name.
Use case resumes from step 4.
-
5a. Educator does not select any students.
-
5a1. System informs the educator that at least one student must be added to the group.
Use case resumes from step 4.
-
-
6a. System detects invalid characters in the group name.
- 6a1. System requests the educator to enter a valid group name.
-
6a2. Educator enters a valid group name.
Use case resumes from step 6.
Use Case: UC08 - Locate Groups by Name
Main Success Scenario (MSS):
- Educator chooses to search for groups.
- System prompts for the group name or keywords.
- Educator enters the group name or search keywords.
- System searches for matching groups.
-
System displays the list of matching groups.
Use case ends.
Extensions:
-
4a. No groups match the search criteria.
-
4a1. System informs the educator that no matching groups were found.
Use case ends.
-
Use Case: UC09 - Delete a Group
Main Success Scenario (MSS):
- Educator chooses to delete a group.
- System prompts for the group name.
- Educator enters the group name.
- System deletes the group from the group list.
-
System displays a confirmation message.
Use case ends.
Extensions:
-
3a. The specified group name does not exist.
- 3a1. System informs the educator that the group was not found.
-
3a2. Educator enters a valid group name.
Use case resumes from step 4.
Use Case: UC10 - Add a Tag to a Student
Main Success Scenario (MSS):
- Educator chooses to add a tag to a student.
- System prompts for the student’s index and the tag name.
- Educator enters the student’s index and tag name.
- System validates the input.
- System adds the tag to the student.
-
System displays a confirmation message.
Use case ends.
Extensions:
-
2a. The specified student index is invalid.
- 2a1. System informs the educator of the invalid index.
-
2a2. Educator enters a valid index.
Use case resumes from step 3.
-
3a. The tag name is invalid or already exists for the student.
- 3a1. System informs the educator of the invalid or duplicate tag.
-
3a2. Educator enters a valid and unique tag name.
Use case resumes from step 4.
Use Case: UC11 - Delete a Tag from a Student
Main Success Scenario (MSS):
- Educator chooses to delete a tag from a student.
- System prompts for the student’s index and the tag name.
- Educator enters the student’s index and tag name.
- System validates the input.
- System removes the tag from the student.
-
System displays a confirmation message.
Use case ends.
Extensions:
-
2a. The specified student index is invalid.
- 2a1. System informs the educator of the invalid index.
-
2a2. Educator enters a valid index.
Use case resumes from step 3.
-
3a. The tag does not exist for the student.
- 3a1. System informs the educator that the tag was not found.
-
3a2. Educator enters a valid tag name.
Use case resumes from step 4.
Use Case: UC12 - Import Students
Main Success Scenario (MSS):
- Educator chooses to import students from a CSV file.
- System prompts for the CSV file location.
- Educator provides the file location.
- System validates the file location and format.
- System reads student data from the CSV file.
- System adds new, non-duplicate students to the student list.
-
System displays a summary of the import process, including the number of students imported and any duplicates found.
Use case ends.
Extensions:
-
3a. The file location is invalid or the file does not exist.
- 3a1. System informs the educator that the file was not found.
-
3a2. Educator provides a valid file location.
Use case resumes from step 4.
-
4a. The file format is invalid or corrupted.
-
4a1. System informs the educator of the invalid file format.
Use case ends.
-
Use Case: UC13 - Export Students
Main Success Scenario (MSS):
- Educator chooses to export students to a CSV file.
- System exports all student data to a CSV file at a default location.
-
System displays a confirmation message with the file location.
Use case ends.
Use Case: UC14 - Clear All Entries
Main Success Scenario (MSS):
- Educator chooses to clear all entries.
- System deletes all student and group data.
-
System displays a confirmation message.
Use case ends.
Non-Functional Requirements
- Should work on any mainstream OS as long as it has Java
17or above installed. - Should be able to hold up to 1000 persons without a noticeable sluggishness in performance for typical usage.
- A user with above average typing speed for regular English text (i.e. not code, not system admin commands) should be able to accomplish most of the tasks faster using commands than using the mouse.
- Should be usable by an Educator who has never used a command line interface.
- Should not terminate unless exit command given.
Glossary
- Mainstream OS: Windows, Linux, Unix, MacOS
- Educator: Primary, secondary, JC, poly teacher
- Duplicate Student: Student with the same name (case-insensitive)
- Duplicate Group: Group with the same name (case-insensitive)
Appendix: Instructions for manual testing
Given below are instructions to test the app manually.
Note: These instructions only provide a starting point for testers to work on;
testers are expected to do more exploratory testing.
Launch and shutdown
-
Initial launch
-
Download the jar file and copy into an empty folder
-
Double-click the jar file Expected: Shows the GUI with a set of sample contacts. The window size may not be optimum.
-
-
Saving window preferences
-
Resize the window to an optimum size. Move the window to a different location. Close the window.
-
Re-launch the app by double-clicking the jar file.
Expected: The most recent window size and location is retained.
-
Deleting a person
-
Deleting a person while all persons are being shown
-
Prerequisites: List all persons using the
listcommand. Multiple persons in the list. -
Test case:
delete 1
Expected: First contact is deleted from the list. Details of the deleted contact shown in the status message. Timestamp in the status bar is updated. -
Test case:
delete 0
Expected: No person is deleted. Error details shown in the status message. Status bar remains the same. -
Other incorrect delete commands to try:
delete,delete x,...(where x is larger than the list size)
Expected: Similar to previous.
-
Appendix: Planned Enhancements
This section outlines future enhancements planned for the application.
Enhancement 1: Export Specific Groups to CSV Files
Current Issue:
The export command exports all GoonBook data without filtering options, lacking the ability to export specific groups.
Proposed Enhancement:
Allow users to export selected groups to CSV files, providing a choice based on user preference.
Justification:
Selective export enhances data portability, enabling users to share or back up specific groups as needed.
Updated Behavior:
- Introduce an
exportGroupcommand for exporting chosen groups to a CSV file.
Enhancement 2: Custom Export Filename and File Path
Current Issue:
The export command defaults to exporting data to the root path with an unchangeable filename, exported_data.csv.
Proposed Enhancement:
Allow users to specify a custom filename and file path when exporting data.
Justification:
Flexible file naming and location options improve user experience, allowing organization based on user preferences.
Updated Behavior:
- Modify the
exportcommand to accept optional filename and file path parameters.
Enhancement 3: Import Groups from CSV Files
Current Issue:
The import command imports all data from a CSV file indiscriminately, with no way to distinguish group data.
Proposed Enhancement:
Add an importGroup command that creates groups based on CSV data, adding new students as needed or using existing ones.
Justification:
This simplifies data entry and supports easy migration of group data into the application.
Updated Behavior:
- Implement an
importGroupcommand to import groups and members from CSV files. - Automatically add new students to the database when importing.
Enhancement 4: Improved Handling of Duplicate Student Names
Current Issue:
The addCommand does not allow students with duplicate names, although real-life duplicates may exist.
Proposed Enhancement:
Implement a unique identifier (e.g., student ID) for each student to handle duplicates better.
Justification:
Using names as unique identifiers is unreliable; a unique ID ensures data integrity and accurate student identification.
Updated Behavior:
- Introduce a unique student identifier.
- Update commands and data storage to use the new primary key.
Enhancement 5: Support Special Characters in Names and Class Fields
Current Issue:
The addCommand cannot handle special characters in names, such as “s/o” due to character restrictions.
Proposed Enhancement:
Allow special characters in student names and class fields.
Justification:
Support for special characters improves data accuracy and reflects real-life names more accurately.
Updated Behavior:
- Adjust input validation to permit special characters in names and class fields.
Enhancement 6: Support Additional Student Information
Current Issue:
The Person object has limited attributes, missing information such as grades, attendance, and guardian details.
Proposed Enhancement:
Extend the Person class to store additional information like grades, notes, and guardian contact details.
Justification:
Comprehensive profiles assist educators in managing and understanding their students better, reducing tutor workload.
Updated Behavior:
- Add new fields for grades, notes, and guardian information to the
Personclass. - Update the UI to display this additional information.
Enhancement 7: Advanced Filtering Options for Students
Current Issue:
The FindCommand and FindGroupCommand are limited to name-based keyword searches, with no filtering by other criteria.
Proposed Enhancement:
Expand filtering to allow users to search based on grades, attendance, class, and other attributes.
Justification:
Enhanced filtering enables efficient student management, helping users find students that meet specific criteria.
Updated Behavior:
- Add a
filtercommand to allow searching and sorting by various attributes like grades, attendance, and class.
Enhancement 8: Precise Student Name Searching
Current Issue:
The FindCommand does not support keywords with whitespace, making it challenging to search for full names.
Proposed Enhancement:
Enable search functionality to handle keywords with spaces, allowing precise name searches.
Justification:
Allowing whitespace in searches improves accuracy, letting users find specific names like “Gong Yi” easily.
Updated Behavior:
- Update the
findcommand to accept phrases enclosed in quotes for exact matches. - Enhance parsing to handle whitespace in keywords.
This updated format uses consistent headings, clearer language, and cleaner formatting, improving readability and organization.